Angular provides option to listen and fire action for each user initiated event in a typical web application. Event binding is the process of targeting an event in a HTML element/component and set a responder for the target event. The responder will execute once the event is fired.
In this tutorial, we will understand Event Binding.
How to use Event Binding?
An event can be set for an HTML element/component by including the event name inside the bracket (( )) and assigning a template statement. The template statement will execute once the event is fired by the user. The generic syntax to set an action for an event is as follows:
(<event_name>)="template statement"
The syntax to listen a click event of a button is as follows:
Now, myAction() will execute whenever the submit button is clicked by the user.
Event Object ($event)
Event object has the data about target and the event send by the firing event to the responding action. Angular expose the event object of any event in the an object represented by $event in the context of template.
To get the event object of the button click event, use $event object available in the template as shown below −
Now, modify the action, myAction() in the component to use the $event object as shown below −
myAction(e){
   e.preventDefault()}
Here, preventDefault() is the method available in the HtmlButtonElement’s event object to suppress the button events built-in action like submitting the form.
Types of Events
Angular supports all events in a web application and the events are categorized by its source and usage. The type of events are as follows:
Mouse events
Keyboard based events
Touch based events
Document based events
Let’s learn them one by one in brief.
Mouse Based Events
Mouse based events are events fired by mouse actions like click, scroll, movement, drag, etc.,. Some of the most important events in this category and its angular event binding target name are given below −
Single click – (click)
Double click – (dblclick)
Mouse down – (mousedown)
Mouse up – (mouseup)
Mouse entering an element – (mouseenter)
Mouse leaving an element – (mouseleave)
Scrolling a block – (scroll)
Holding and dragging an element – (drag)
Holding and dropping an element – (drop)
Dragging an event over the target drop event – (dragover)
Keyboard Based Events
Keyboard based events are events fired when the user works on the keyboard. Some of the most important events in this category are mentioned below −
Pressing a key – (keydown)
Releasing a key – (keyup)
Pressing a character key – (keypress)
Focusing an element – (focus)
Opposite of focusing an element – (blur)
Pressing a specific key or key combination like Shift + T (keydown.shift.t)
Events targeting a specific key press can be done using below format:
keydown.<modifier_key>.<key_code>
keydown.<key_code>
keydown.code.<event code separated by dot(.)>
Here,
Modifier_key represents shift, alt and control
Key_code represent the target keyboard code like alphabets, digit, etc., as specified in HTML spec. Example, keydown.shift.t
Event code represent the event code as specified in HTML spec like keyT, Tab, etc.,
For example, pressing shift key and t at the same time can be targeted as shown below −
Touch based events are events fired when the user interacts through a touch device. Some of the most important events in this category are as follows −
Pointing an element and start moving in a touch device – (touchstart)
Pointing an element and Moving in a touch device – (touchmove)
Pointing an element and stop moving in a touch device – (touchend)
Web Document Based Events
Web document based events are specific events fired in the web document to perform actions like cut, copy and paste a text, submitting a form, etc., Some of the most important events in this category are mentioned below −
Submitting a form by clicking the submit button – (submit)
Copying a text to clipboard – (copy)
Pasting a text from clipboard – (paste)
Deleting and copying a piece of text to clipboard – (cut)
Implementing Event Binding
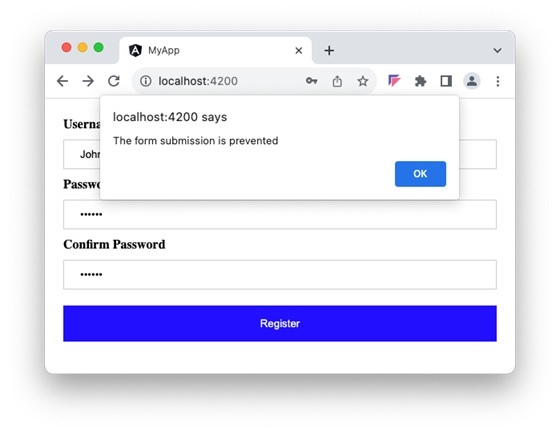
Let us create a simple registration form to understand attribute binding. Our registration form will have three input field as shown below and a button to submit the registration form.
Username
Password
Confirm password
Step 1: Create a new application, my-app using angular CLI as shown below −
ng newmy-app
Step 2: Create a new registration form component, RegisterForm using angular CLI as shown below −
ng generate component RegisterForm
Step 3: Next, open the registration form component’s template and add a form with username, password and confirm password.
Step 11: Run the application and check the output. Clicking the button does not submit the form as it is intercepted and prevented using event binding.
Leave a Reply