Angular allows the component to be dynamically created and loaded at run time at a specific location in the host (another) component. Loading a component at run time opens a lot of opportunities to do advanced functionality. For example, a banner rotation component can accept heavily customized banner item instead of accepting banners confirming to a specific template, which is always pre-defined and static in nature.
Let us learn how to create an Angular component at run time and attach it to the host component in this chapter.
How to Render Angular Components Dynamically?
There are two ways to create dynamic components in Angular:
Using NgComponentOutlet
Using ViewContainerRef
Using NgComponentOutlet
The NgComponentOutlet is a directive that helps in dynamic component creation. It instantiates a Component and embeds its view (host view) inside the current view. Please note it only accepts Components and to use it, you need to import CommonModule.
Example
In this example, we see the practical implementation of NgComponentOutlet directive. Here, we create an Angular application that will have two main child components and they will be associated with buttons named Admin and User. On clicking the Admin button, AdminBioComponent will be displayed and when you click the User button, StandardBioComponent will be displayed.
Step 1: Create AdminBioComponent using the given command −
ng g c admin-bio
Step 2: Create a second component, StandardBioComponent using the command given below −
ng g c standard-bio
Step 3: We need another component that will contain the logic of dynamic component creation.
ng g c check-bio
Step 4: Now, open admin-bio.component.html file and copy the below code −
<h3>Admin Bio</h3><p>Content of the Admin Bio Component.</p>
Step 5: Then, open standard-bio.component.html file and copy the below code −
<h3>Standard Bio</h3><p>Content of the Standard Bio Component.</p>
Step 6: Next, open check-bio.component.html file and copy the below code −
Step 7: In the check-bio.component.ts file, create a method named getBioComponent(). This method will check which button is clicked among the two and display the view accordingly. The complete code is given below −
Step 8: Next, open app.component.html file and copy the below code −
<!-- buttons to trigger admin() and userLog() methods --><button(click)="admin()">Admin</button><button(click)="userLog()">User</button><!-- conditional rendering --><div *ngIf="isValid"><!--input binding --><app-check-bio [user]="user"></app-check-bio><router-outlet /></div>
Here, the given buttons will trigger the admin() and userLog() methods. The *ngIf directive conditionally includes the <div> element in the DOM if the isValid property is true. If it is false, the <div> and its contents are not rendered.
Step 10: Finally, inside the app.component.ts file, copy the below code −
The second way of creating and rendering components dynamically is by using ViewContainerRef. Other components or directives use it to get a reference to a view container corresponding to their location in the DOM. In this way, ViewContainerRef helps to dynamically create and insert components at that specific location.
Example
Let us create a real time application to display a collection of employees in two different formats, table and gallery. We will create two components, one to show employees in the table and another in gallery format. Then we will create a host component, which will dynamically load either table based component or gallery based component.
Step 1: Create an interface to hold common data across multiple dynamic component
$ ng generate interfaceDynDataCREATE src/app/dyn-data.ts(29 bytes)
Step 2: Create a directive, DynSample. The purpose of the directive is to target and select the view container (where dynamic component will be placed) in the host component template.
$ ng generate directive DynSample
CREATE src/app/dyn-sample.directive.spec.ts(237 bytes)CREATE src/app/dyn-sample.directive.ts(147 bytes)
Step 3: Create a dynamic component, DynList. The purpose of the component is to list the employee as gallery.
Step 5: Create a host component, DynHost. The purpose of the component is to host any one of the component, DynList and DynTable based on configuration.
Attribute directive purpose is to target the element (ng-template) in the host components template where the dynamic component will be injected.
appDynSample is the selector to target and select the element (ng-template). The dynamic component will be created, initialized and injected into the appHello element (ng-template) later.
Step 7: Next, initialize the view component reference object (ViewComponentRef) in the directive as shown below −
Imported the ViewContainerRef from @angular/core module
Initialized the viewContainerRef object through contructor dependency injection. viewContainerRef is the view container of the targeted element (ng-template) in the host components template. ViewContainerRef has method to dynamically create a component and append that component to it. We will use it later in the host component to dynamically create the DynListComponent and DynTableComponent.
Step 8: Next, open the interface, DynData and add an array property, data
exportinterfaceDynData{
data : any[]}
Step 9: Next, open the DynListComponent component and implement DynData interface.
Step 24: Next, open the app components template and include the host component.
<app-dyn-host format="table"/>
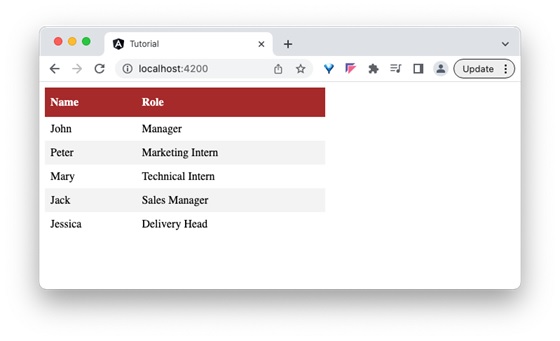
Here, we have directed the host component to render the employees data in the tabular format. The host component will dynamically create the DynTableComponent and inject into the host component template.
Step 25: Next, run the application and you can see that the employee data is shown in a tabular format as shown below −
Step 26: Next, open the app components template and change the format to gallery.
<app-dyn-host format="gallery"/>
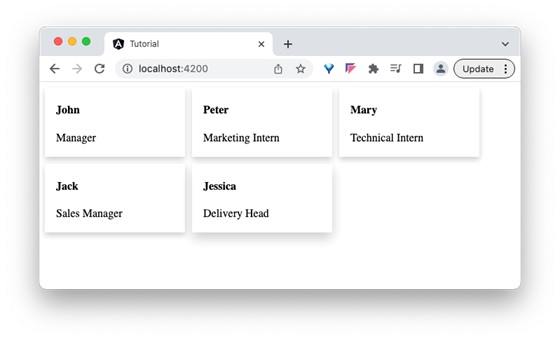
Here, we have directed the host component to render the employees data in gallery format. The host component will dynamically create the DynListComponent and inject into the host component template.
Step 27: Next, run the application and you can see that the employee data is shown in gallery format as shown below −
Leave a Reply