UNION and UNION ALL operators are just the SQL implementation of algebraic set operators. Both of them are used to retrieve the rows from multiple tables and return them as one single table. The difference between these two operators is that UNION only returns distinct rows while UNION ALL returns all the rows present in the tables.
However, for these operators to work on these tables, they need to follow the conditions given below −
The tables to be combined must have the same number of columns with the same datatype.
The number of rows need not be the same.
Once these criterion are met, UNION or UNION ALL operator returns the rows from multiple tables as a resultant table.
Column names of first table will become column names of the resultant table, and contents of second table will be merged into resultant columns of same data type.
What is UNION?
UNION is a type of operator/clause in SQL, that works similar to the union operator in relational algebra. It just combines the information from multiple tables that are union compatible.
Only distinct rows from the tables are added to the resultant table, as UNION automatically eliminates all the duplicate records.
Syntax
Following is the syntax of UNION operator in SQL −
SELECT*FROM table1
UNIONSELECT*FROM table2;
Example
Let us first create two tables COURSES_PICKED and EXTRA_COURSES_PICKED with the same number of columns having the same data types.
Create table COURSES_PICKED using the following query −
The resultant table obtained after performing the UNION operation is as follows −
STUDENT_ID
STUDENT_NAME
COURSE_NAME
1
JOHN
ENGLISH
2
ROBERT
COMPUTER SCIENCE
3
SASHA
COMMUNICATIONS
4
JULIAN
MATHEMATICS
1
JOHN
PHYSICAL EDUCATION
2
ROBERT
GYM
3
SASHA
FILM
What is UNION ALL?
UNION ALL is also an operator/clause in SQL, that is used to combine multiple tables into one table. However, this operator also preserves the duplicate rows in the resultant tables.
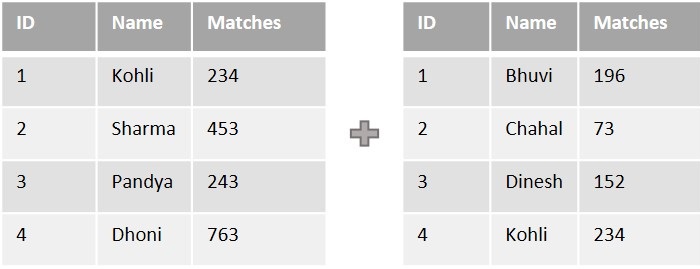
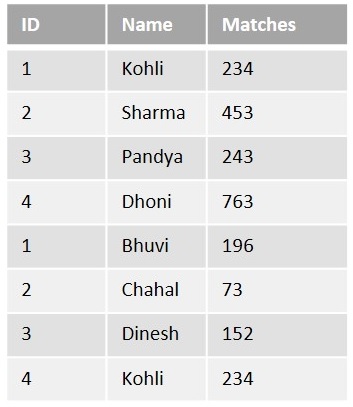
Suppose there are two tables, one of which contains the number of games a player competed in internationally and the other contains the number of games a player played nationally.
As we can see in the tables above, Kohli played 234 matches internationally and 234 matches nationally. Even though the data in these columns is the same, they are all separate matches. There is a need to include both rows in the resultant table displaying the total matches played by a player. So, we use the UNION ALL operator in such cases.
Syntax
Following is the syntax of UNION ALL operator in SQL −
SELECT*FROM table1
UNIONALLSELECT*FROM table2;
Example
In the following example, let us perform UNION ALL operation on the same sample tables given above: “COURSES_PICKED” and “EXTRA_COURSES_PICKED”, using the given query below −
The SQL UNION operator is used to combine data from multiple tables by eliminating duplicate rows (if any).
To use the UNION operator on multiple tables, all these tables must be union compatible. And they are said to be union compatible if and only if they meet the following criteria −
The same number of columns selected with the same datatype.
These columns must also be in the same order.
They need not have same number of rows.
Once these criterion are met, the UNION operator returns the rows from multiple tables as a resultant table which is void of all duplicate values from these tables.
The column names in the final result set will be based on the column names selected in the first SELECT statement. If you want to use a different name for a column in the final result set, you can use an alias in the SELECT statement.
Syntax
The basic syntax of a UNION operator is as follows −
Here, the given condition could be any given expression based on your requirement.
UNION on a Single Field
If we want to use UNION to combine the result sets of two or more SELECT statements on a single field, we can simply include that field in the SELECT statement of each query. The UNION operator will automatically remove any duplicate values in the final result set.
When using UNION on a single field, the column names in the result set will be determined by the column name in the first SELECT statement. Therefore, you may need to use an alias in the SELECT statement to ensure that the column name is meaningful for the final result set.
Example
Assume we have created a table with name CUSTOMERS in MySQL database using CREATE TABLE statement as shown below −
CREATETABLE CUSTOMERS (
   ID INTNOTNULL,
   NAME VARCHAR(20)NOTNULL,
   AGE INTNOTNULL,
   ADDRESS CHAR(25),
   SALARY DECIMAL(18,2),PRIMARYKEY(ID));
Following query inserts values into this table using the INSERT statement −
Using the following query, let us combine the SALARY and AMOUNT columns from CUSTOMERS and ORDERS table (since these columns have similar datatypes) −
SELECT SALARY FROM CUSTOMERS UNIONSELECT AMOUNT FROM ORDERS;
Output
Output of the above query is as follows −
SALARY
2000.00
1500.00
6500.00
8500.00
4500.00
10000.00
3000.00
1560.00
2060.00
UNION on Multiple Fields
When we use UNION on multiple fields, the number and order of the fields in each SELECT statement must match. Also, the data types of the fields in each SELECT statement must be compatible for the UNION to work correctly. If the data types are not compatible, you may need to use conversion functions such as CAST or CONVERT to ensure that the data types match.
Example
As the CUSTOMERS and ORDERS tables are not union-compatible individually, let us first join these two tables into a bigger table using Left Join and Right Join. The joined tables retrieved will have same number of columns with same datatypes, becoming union compatible. Now, these tables are combined using UNION query shown below −
We can use the WHERE clause with UNION operator to filter the results of each SELECT statement before combining them.
Syntax
Following is the syntax for using the WHERE clause with UNION operator −
SELECT column1, column2, column3
FROM table1
WHERE column1 ='value1'UNIONSELECT column1, column2, column3
FROM table2
WHERE column1 ='value2';
Example
In the following query, we are retrieving the id’s of the customers where id is greater than 5 and 2 from the ‘CUSTOMERS’ and ‘ORDERS’ tables respectively −
SELECT ID, SALARY FROM CUSTOMERS WHERE ID >5UNIONSELECT CUSTOMER_ID, AMOUNT FROM ORDERS WHERE CUSTOMER_ID >2;
Output
Following is the result produced −
ID
SALARY
6
4500.00
7
10000.00
3
3000.00
3
1500.00
4
2060.00
UNION with ORDER BY Clause
When we use UNION with ORDER BY clause, it combines the sorted result sets of all SELECT statements and produces a single sorted result set.
Example
In here, we are retrieving the id’s of the customers where id is greater than 5 and 2 from the ‘CUSTOMERS’ and ‘ORDERS’ tables respectively, sorted low to high from their salary −
SELECT ID, SALARY FROM CUSTOMERS WHERE ID >5UNIONSELECT CUSTOMER_ID, AMOUNT FROM ORDERS WHERE CUSTOMER_ID >2ORDERBY SALARY;
Output
Following is the output of the above query −
ID
SALARY
3
1500.00
4
2060.00
3
3000.00
6
4500.00
7
10000.00
The ORDER BY clause in a UNION statement applies to the entire result set, not just the last SELECT statement.
UNION with Aliases
We can use aliases in the SELECT statement of UNION operator to give a table or column a temporary name, which can be useful when working with multiple tables or columns with similar names.
When using UNION with aliases, it’s important to note that the column aliases are determined by the first SELECT statement. Therefore, if you want to use different aliases for the same column in different SELECT statements, you need to use column aliases in all SELECT statements to ensure consistent column names in the final result set.
Syntax
Following is the syntax for using Union with Aliases −
SELECT column1 AS alias1, column2 AS alias2
FROM table1
UNIONSELECT column3 AS alias1, column4 AS alias2
FROM table2;
Example
The following query retrieves all the id’s from both tables, along with an indication of whether each id is of the customer or the order made by them −
There are two other operators which are like the UNION operator.
SQL INTERSECT Operator − This is used to combine two SELECT statements, but returns rows only from the first SELECT statement that are identical to a row in the second SELECT statement.
SQL EXCEPT Operator − This combines two SELECT statements and returns rows from the first SELECT statement that are not returned by the second SELECT statement.
The BETWEEN operator is a logical operator in SQL, that is used to retrieve the data within a specified range. The retrieved values can be integers, characters, or dates.
You can use the BETWEEN operator to replace a combination of “greater than equal AND less than equal” conditions.
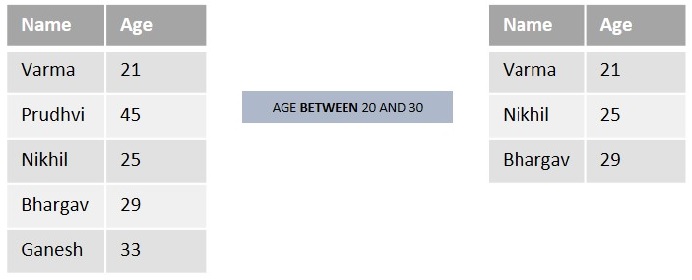
Let us understand it in a better way by using the below example table −
Suppose we want to list out the names from the above table who are aged BETWEEN 20 and 30. So, we will get “Varma(21)”, “Nikhil(25)”, and “Bhargav(29)” as a result.
Syntax
Following is the syntax of the BETWEEN operator in SQL −
SELECT column1, column2, column3,....columnN
FROM table_name
WHEREcolumnBETWEEN value1 AND value2;
Here,
value1 is the beginning value of the range.
value2 is the ending value of the range (inclusive).
Example
First of all, let us create a table named CUSTOMERS using the following query −
CREATETABLE CUSTOMERS (
   ID INTNOTNULL,
   NAME VARCHAR(20)NOTNULL,
   AGE INTNOTNULL,
   ADDRESS CHAR(25),
   SALARY DECIMAL(18,2),PRIMARYKEY(ID));
Once the table is created, let us insert some values into the table using the following INSERT query −
Now, we are using the BETWEEN operator to retrieve the details of the CUSTOMERS whose AGE (numeric data) is between 20 and 25 −
SELECT*FROM CUSTOMERS WHERE AGE BETWEEN20AND25;
Output
When we execute the above query, the output is obtained as follows −
ID
NAME
AGE
ADDRESS
SALARY
2
Khilan
25
Delhi
1500.00
3
Kaushik
23
Kota
2000.00
4
Chaitali
25
Mumbai
6500.00
6
Komal
22
Hyderabad
4500.00
7
Muffy
24
Indore
10000.00
Example
Here, we are using the BETWEEN operator with characters. Let us retrieve the details of the customers whose names starts in between the alphabets “A” and “L” using the following query −
SELECT*FROM CUSTOMERS WHERE NAME BETWEEN'A'AND'L';
Output
Following is the output of the above query −
ID
NAME
AGE
ADDRESS
SALARY
2
Khilan
25
Delhi
1500.00
3
Kaushik
23
Kota
2000.00
4
Chaitali
25
Mumbai
6500.00
5
Hardik
27
Bhopal
8500.00
6
Komal
22
Hyderabad
4500.00
BETWEEN Operator with IN Operator
In SQL, we can combine the BETWEEN operator with the IN operator to select values that are within a specified range and also matches with values specified in the list of IN clause.
Example
In the following query, we are retrieving the details of all the customers whose salary is between 4000 and 10000. In addition, we are only retrieving the customers who lives in Hyderabad and Bhopal using the IN operator in SQL −
SELECT*FROM CUSTOMERS
WHERE SALARY BETWEEN4000AND10000AND ADDRESS IN('Hyderabad','Bhopal');
Output
On executing the above query, the output is displayed as follows −
ID
NAME
AGE
ADDRESS
SALARY
5
Hardik
27
Bhopal
8500.00
6
Komal
22
Hyderabad
4500.00
BETWEEN Operator with UPDATE Statement
We can also use the BETWEEN operator with the UPDATE statement to update values within the specified range. The UPDATE statement is used to modify existing data in a database table.
Example
Let us update the salaries of the customers whose age lies between 25 to 30 using the following query −
UPDATE CUSTOMERS SET SALARY =10000WHERE AGE BETWEEN25AND30;
Output
The output for the above query is as given below −
Let us verify whether the salaries are updated or not using the following query −
SELECT*FROM CUSTOMERS;
The table for the above query produced as given below −
ID
NAME
AGE
ADDRESS
SALARY
1
Ramesh
32
Ahmedabad
2000.00
2
Khilan
25
Delhi
10000.00
3
Kaushik
23
Kota
2000.00
4
Chaitali
25
Mumbai
10000.00
5
Hardik
27
Bhopal
10000.00
6
Komal
22
Hyderabad
4500.00
7
Muffy
24
Indore
10000.00
BETWEEN Operator with DELETE Statement
We can also use the BETWEEN operator with the DELETE statement to delete rows within a specified range.
Example
Now, let us delete the customers whose age is between 20 and 24 using the DELETE statement −
DELETEFROM CUSTOMERS
WHERE AGE BETWEEN20AND24;
Output
If we compile and run the above query, the result is produced as follows −
Query OK, 3 rows affected (0.02 sec)
Verification
Let us verify whether the records with the specified age values are deleted or not, using the following query −
SELECT*FROM CUSTOMERS;
The table for the above query produced is as given below −
ID
NAME
AGE
ADDRESS
SALARY
1
Ramesh
32
Ahmedabad
2000.00
2
Khilan
25
Delhi
1500.00
4
Chaitali
25
Mumbai
6500.00
5
Hardik
27
Bhopal
8500.00
NOT BETWEEN Operator
The NOT BETWEEN operator in SQL works exactly opposite to BETWEEN operator. This is used to retrieve the data which is not present in the specified range.
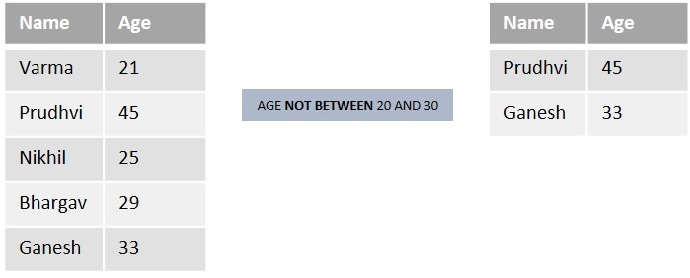
Let us understand in a better way by using the below example table −
Suppose we want to list out the students from the above table who are aged not between 20 and 30. So, we will get “Prudhvi(45) and Ganesh(33)” as result.
Syntax
Following is the syntax of the NOT BETWEEN operator in SQL −
SELECT column_name1, column_name2, column_name3,......column_nameN
FROM table_name
WHERE column_name NOTBETWEEN value1 AND value2;
Example
Consider the previously created CUSTOMERS table and let us retrieve the details of customers whose age is not greater than or equal to 25 and less than or equal to 30 (numeric data) using the following query −
SELECT*FROM CUSTOMERS
WHERE AGE NOTBETWEEN25AND30;
Output
When we execute the above query, the output is obtained as follows −
ID
NAME
AGE
ADDRESS
SALARY
1
Ramesh
32
Ahmedabad
2000.00
3
Kaushik
23
Kota
2000.00
6
Komal
22
Hyderabad
4500.00
7
Muffy
24
Indore
10000.00
NOT BETWEEN Operator with IN
We can use the NOT BETWEEN operator in combination with the IN operator to select values that are outside a range and also do not match with the specified list of values.
Example
In the following query, we are selecting the customers whose salary is not between 1000 and 5000. In addition; we are not retrieving the customers who are living in Bhopal using the IN operator in SQL −
SELECT*FROM CUSTOMERS
WHERE SALARY NOTBETWEEN1000AND5000AND ADDRESS NOTIN('Bhopal');
Output
On executing the above query, the output is displayed as follows −
In a table, columns can typically accept NULL values by default. However, if you want to ensure that a particular column does not contain NULL values, you need to add the NOT NULL constraint/condition on that column.
The SQL NOT NULL Constraint
The NOT NULL constraint in SQL is used to ensure that a column in a table doesn’t contain NULL (empty) values, and prevent any attempts to insert or update rows with NULL values.
Usually, if we don’t provide value to a particular column while inserting data into a table, by default it is considered as a NULL value. But, if we add the NOT NULL constraint on a column, it will enforce that a value must be provided for that column during the data insertion, and attempting to insert a NULL value will result in a constraint violation error.
Syntax
Following is the basic syntax of NOT NULL constraint while creating a table −
To add the NOT NULL constraint on a column of a table, we just need to add the keyword “NOT NULL” after the column’s data type in the column definition.
Example
First of all, let us create a table named CUSTOMERS using the following query −
CREATETABLE CUSTOMERS(
   ID INTNOTNULL,
   NAME VARCHAR(20)NOTNULL,
   AGE  INTNOTNULL,
   ADDRESS CHAR(25),
   SALARY DECIMAL(20,2),PRIMARYKEY(ID));
Let’s insert some values into the above created table using the following INSERT query −
To display the structure of a table in MySQL database, we use the DESCRIBE command. The DESCRIBE command provides a summary of the columns, data types, and various attributes of the table as shown below −
DESCRIBE CUSTOMERS;
As we can see in the output below, the table shows information about the column names of the table, their types, and whether they are nullable or not.
Field
Type
Null
Key
Default
Extra
ID
int
NO
PRI
NULL
NAME
varchar(20)
NO
NULL
AGE
int
NO
NULL
ADDRESS
char(25)
YES
NULL
SALARY
decimal(20,2)
YES
NULL
Removing a NOT NULL Constraint From the Table
In SQL, to remove a NOT NULL constraint of a column in an existing table, we need to use the ALTER TABLE statement. Using this statement, we can modify the definition of a column i,e you can change the name, data type or constraint of an existing column.
One of a way to remove the NOT NULL constraint on a column is to changing it to NULL.
Syntax
Following is the syntax to remove a not null constraint from the table in MySQL database −
Now, let us display the structure of the table named “CUSTOMERS” using the following query −
DESCRIBE CUSTOMERS;
As we can see in the table below, the column “NAME” is modified to nullable, which means NULL values are allowed in this column.
Field
Type
Null
Key
Default
Extra
ID
int
NO
PRI
NULL
NAME
varchar(20)
YES
NULL
AGE
int
NO
NULL
ADDRESS
char(25)
YES
NULL
SALARY
decimal(20,2)
YES
NULL
Adding a NOT NULL Constraint to the Existing Table
In the previous section, we have removed the NOT NULL constraint on a column by changing its definition using the ALTER TABLE statement. Similarly, we can add a NOT NULL constraint to a column in an existing table using the ALTER TABLE statement.
Syntax
Following is the SQL syntax to add the NOT NULL constraint to the existing column in MySQL database −
Assume the previously created table CUSTOMERS and let us modify the ADDRESS column ensuring that it does not allow null values using the following query −
A NULL value indicates a missing or unknown value. It appears to be blank and does not contain any data. It is very important to understand that a NULL value is different than a zero value or a field that contains spaces. For checking null values we can use two basic operators.
IS NULL
IS NOT NULL
The SQL IS NOT NULL Operator
The SQL IS NOT NULL operator is used to filter data by verifying whether a particular column has a not-null values. This operator can be used with SQL statements such as SELECT, UPDATE, and DELETE.
By using the IS NOT NULL operator, we can only fetch the records that contain valid data in a particular column.
Syntax
Following is the syntax of the SQL IS NOT NULL operator −
SELECT column_names
FROM table_name
WHERE column_name ISNOTNULL;
Example
Firstly, let us create a table named CUSTOMERS using the following query −
CREATETABLE CUSTOMERS(
   ID INTNOTNULL,
   NAME VARCHAR(20),
   AGE INT,
   ADDRESS CHAR(25),
   SALARY DECIMAL(18,2),PRIMARYKEY(ID));
Now, insert values into this table using the INSERT statement as follows −
Truncate the CUSTOMERS table and reinsert all the 7 records into it again. The following query, increments all the values in the SALARY column of the with 5000, where the salary value is not null −
UPDATE CUSTOMERS SET SALARY = SALARY+5000WHERE SALARY ISNOTNULL;
Output
When we execute the program above, the output is obtained as follows −
Let’s assume a table with NULL values in some of its fields. These fields indicate that no values are present in them. SQL allows users to create new records or modify existing ones without specifying a value for a field. If no value is provided, the field is stored with a NULL value.
In SQL, it is not possible to check NULL values with comparison operators such as =, <, or <>. Instead, we use the IS NULL and IS NOT NULL (negation of NULL values) operators.
The SQL IS NULL Operator
The SQL IS NULL operator is used to check whether a value in a column is NULL. It returns true if the column value is NULL; otherwise false.
The NULL is a value that represents missing or unknown data, and the IS NULL operator allows us to filter for records that contain NULL values in a particular column.
Syntax
Following is the syntax of IS NULL operator −
SELECT column_name1, column_name2, column_name3,..., column_nameN
FROM table_name
WHERE column_nameN ISNULL;
Example
Firstly, let us create a table named CUSTOMERS using the following query −
CREATETABLE CUSTOMERS(
 ID INTNOTNULL,
 NAME VARCHAR(20),
 AGE INT,
 ADDRESS CHAR(25),
 SALARY DECIMAL(18,2),PRIMARYKEY(ID));
Now, insert values into this table using the INSERT statement as follows −
The SQL NOT EQUAL operator is used to compare two values and return true if they are not equal. It is represented by “<>” and “!=”. The difference between these two is that <> follows the ISO standard, but != doesn’t. So, it is recommended to use the <> operator.
We can use the NOT EQUAL operator in WHERE clause to filter records based on a specific condition and in GROUP BY clause to group the results.
The comparison is case-sensitive by default, while using the NOT EQUAL operator with text values.
Syntax
Following is the syntax of the NOT EQUAL operator in SQL −
WHERE expression1 <> expression2;
Example
To understand it better let us consider the CUSTOMERS table which contains the personal details of customers including their name, age, address and salary etc. as shown below −
CREATETABLE CUSTOMERS(
   ID   INTNOTNULL,
   NAME VARCHAR(20)NOTNULL,
   AGE  INTNOTNULL,
   ADDRESS  CHAR(25),
   SALARY   DECIMAL(18,2),PRIMARYKEY(ID));
Now, insert values into this table using the INSERT statement as follows −
We can use the NOT EQUAL operator with text in SQL to compare two text values and return. We can use “<>” or “!=” in the WHERE clause of a SQL statement and exclude rows that match a specific text value.
Example
In the following query, we are retrieving all the records from the CUSTOMERS table whose NAME is not ‘Ramesh’ −
SELECT*FROM CUSTOMERS WHERE NAME <>'Ramesh';
Output
The output of the above code is as shown below −
ID
NAME
AGE
ADDRESS
SALARY
2
Khilan
25
Delhi
1500.00
3
Kaushik
23
Kota
2000.00
4
Chaitali
25
Mumbai
6500.00
5
Hardik
27
Bhopal
8500.00
6
Komal
22
Hyderabad
4500.00
7
Muffy
24
Indore
10000.00
NOT EQUAL with GROUP BY Clause
We can use the NOT EQUAL operator with the GROUP BY clause to group the results by the values that are not equal to the specified text value.
The aggregate functions such as COUNT(), MAX(), MIN(), SUM(), and AVG() are frequently used with the GROUP BY statement.
Example
Here, we are retrieving the number of records with distinct ages (excluding ’22’) in the ‘CUSTOMERS’ table and grouping them by age value −
SELECTCOUNT(ID), AGE FROM CUSTOMERS
WHERE AGE <>'22'GROUPBY AGE;
Output
On executing the above query, it will generate the output as shown below −
COUNT(id)
AGE
1
32
2
25
1
23
1
27
1
24
NOT EQUAL with Multiple Conditions
The not equal operator can also be used with multiple conditions in a WHERE clause to filter out rows that match specific criteria.
Example
Now, we are retrieving all the customers whose salary is either “>2000” or “=2000“. At the same time, the customer must not be from “Bhopal” −
SELECT*FROM CUSTOMERS
WHERE ADDRESS <>'Bhopal'AND(SALARY>'2000'OR SALARY='2000');
Output
Following is the output of the above code −
ID
NAME
AGE
ADDRESS
SALARY
1
Ramesh
32
Ahmedabad
2000.00
3
Kaushik
23
Kota
2000.00
4
Chaitali
25
Mumbai
6500.00
6
Komal
22
Hyderabad
4500.00
7
Muffy
24
Indore
10000.00
Negating a Condition Using NOT EQUAL
In SQL, the NOT EQUAL operator can also be combined with the NOT Operator to negate a condition. It filters out the rows that meet a specific condition.
Example
In the following query, we are retrieving all rows from the “CUSTOMERS” table where the “SALARY” is equal to ‘2000’ −
SELECT*FROM CUSTOMERS WHERENOT SALARY !='2000';
Output
After executing the above code, we get the following output −
Most of the times, there is a need to use two or more conditions to filter required records from a table; but sometimes satisfying one of the conditions would be enough. There are also scenarios when you need to retrieve records that do not satisfy the conditions specified. SQL provides logical connectives for this purpose. They are listed below −
AND − Operator
OR − Operator
NOT − Operator
With the help of these logical connectives, one can retrieve records that are required and also create exceptions for the records that are not needed to be retrieved.
The SQL NOT Operator
SQL NOT is a logical operator/connective used to negate a condition or Boolean expression in a WHERE clause. That is, TRUE becomes FALSE and vice versa.
The most common scenario where this operator can be used occurs when there is a specification of what NOT to include in the result table, instead of what to include.
For instance, in an Indian voting system, people younger than 18 years of age are NOT allowed to vote. Therefore, while retrieving the information of all people who are eligible to vote, using the NOT operator, we can create an exception to minors since it is the only specification.
The NOT operator is always used in a WHERE clause so its scope within the clause is not always clear. Hence, a safer option to exactly execute the query is by enclosing the Boolean expression or a subquery by parentheses.
Syntax
Following is the syntax for SQL NOT operator −
NOT[CONDITION orBOOLEAN EXPRESSION];
Example
In the following example, let us first create a table to demonstrate the usage of NOT operator.
Using the query below, we are creating a table named CUSTOMERS, which contains the personal details of customers including their name, age, address and salary etc. −
CREATETABLE CUSTOMERS (
   ID INTNOTNULL,
   NAME VARCHAR(20)NOTNULL,
   AGE INTNOTNULL,
   ADDRESS CHAR(25),
   SALARY DECIMAL(18,2),PRIMARYKEY(ID));
Now, insert values into this table using the INSERT statement as follows −
The SQL query below retrieves all rows from the ‘CUSTOMERS’ table where the ‘SALARY’ column is not greater than 2000.00 −
SELECT*FROM CUSTOMERS WHERENOT(SALARY >2000.00);
Output
Following is the output of the above query −
ID
NAME
AGE
ADDRESS
SALARY
1
Ramesh
32
Ahmedabad
2000.00
2
Khilan
25
Delhi
1500.00
3
Kaushik
23
Kota
2000.00
SQL NOT Operator with LIKE
The LIKE operator uses wildcards to perform pattern matching on the records of a table before extracting the matched records.
However, to negate this operation (to extract the unmatched records instead), we can use the NOT operator along with LIKE in the form of NOT LIKE keyword.
Example
Using the following query, we are retrieving all rows from the ‘CUSTOMERS’ table where the ‘NAME’ column does not start with the letter ‘K’ −
SELECT*FROM CUSTOMERS WHERE NAME NOTLIKE'K%';
Output
On executing the query above, the table will be displayed as follows −
ID
NAME
AGE
ADDRESS
SALARY
1
Ramesh
32
Ahmedabad
2000.00
4
Chaitali
25
Mumbai
6500.00
5
Hardik
27
Bhopal
8500.00
7
Muffy
24
Indore
10000.00
SQL NOT Operator with IN
The IN operator returns TRUE if the values in a table column belong to a range of numbers specified in the WHERE clause.
To negate this operation, we can use the NOT IN operator instead. With this, the Boolean expression returns TRUE if the records are not present in the given range.
Example
The following SQL query selects all rows from the ‘CUSTOMERS’ table where the ‘AGE’ column does not have values 25, 26, or 32 −
SELECT*FROM CUSTOMERS WHERE AGE NOTIN(25,26,32);
Output
The result table is displayed as follows −
ID
NAME
AGE
ADDRESS
SALARY
3
Kaushik
23
Kota
2000.00
5
Hardik
27
Bhopal
8500.00
6
Komal
22
Hyderabad
4500.00
7
Muffy
24
Indore
10000.00
SQL NOT Operator with IS NULL
The IS NULL operator is used to check whether the records in a table are NULL. If a NULL value is encountered, it returns TRUE; and FALSE otherwise.
Using NOT operator with the IS NULL operator, we can extract all the records that does not contain NULL values.
Example
This SQL query retrieves all rows from the ‘CUSTOMERS’ table where the ‘AGE’ column is not null, i.e. it contains valid age values −
SELECT*FROM CUSTOMERS WHERE AGE ISNOTNULL;
Output
The result table is exactly as the original table as it contains no NULL values −
ID
NAME
AGE
ADDRESS
SALARY
1
Ramesh
32
Ahmedabad
2000.00
2
Khilan
25
Delhi
1500.00
3
Kaushik
23
Kota
2000.00
4
Chaitali
25
Mumbai
6500.00
5
Hardik
27
Bhopal
8500.00
6
Komal
22
Hyderabad
4500.00
7
Muffy
24
Indore
10000.00
However, if the table contains any NULL values, the rows containing it will be omitted in the resultant table.
SQL NOT Operator with BETWEEN
BETWEEN operator is used to establish a range as a condition. When used with WHERE clause, this operator acts like a Boolean expression. That is, if values of a table column fall in the specified range, TRUE is returned; and FALSE otherwise.
Using NOT BETWEEN operator with WHERE clause will return its negation. That is, if values of a table column fall in the specified range, FALSE is returned; and TRUE otherwise.
Example
With the given query below, we are displaying records in the CUSTOMERS table whose salary does not fall between 1500.00 and 2500.00 −
SELECT*FROM CUSTOMERS
WHERE SALARY NOTBETWEEN1500.00AND2500.00;
Output
The resultant table is as follows −
ID
NAME
AGE
ADDRESS
SALARY
4
Chaitali
25
Mumbai
6500.00
5
Hardik
27
Bhopal
8500.00
6
Komal
22
Hyderabad
4500.00
7
Muffy
24
Indore
10000.00
SQL NOT Operator with EXISTS
The EXISTS operator works similar to the IN operator; it compares the table records with the specified range in the WHERE clause. However, the IN operator cannot compare the NULL records with the range while EXISTS does.
The NOT EXISTS operator is used to negate this operation.
Example
In the following example, let us create another table Orders to help in demonstrating the usage of NOT operator with EXISTS operator −
CREATETABLE ORDERS (
   OID INTNOTNULL,DATEVARCHAR(20)NOTNULL,
   CUSTOMER_ID INTNOTNULL,
   AMOUNT DECIMAL(18,2));
Using the INSERT statement, insert values into this table as follows −
The SQL CASE statement is a conditional statement that helps us to make decisions based on a set of conditions. It evaluates the set of conditions and returns the respective values when a condition is satisfied.
The CASE statement works like a simplified IF-THEN-ELSE statement and allows for multiple conditions to be tested.
This starts with the keyword CASE followed by multiple conditionals statements. Each conditional statement consists of at least one pair of WHEN and THEN statements. Where WHEN specifies conditional statements and THEN specifies the actions to be taken.
It is often used to create a new column with values based on the value of an existing column.
Let us look at a simple scenario to understand this statement.
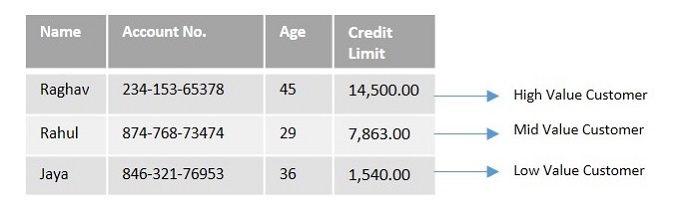
For e.g. when the credit limit of a customer is above ‘10,000’, then the customer will be recognized as a ‘High value customer’; when the credit limit is above ‘5000’, then the customer will be recognized as a ‘Mid value customer’; otherwise the customer will be recognized as the ‘Low value customer’ as shown in the table below −
Syntax
Following is the syntax of SQL CASE statement −
CASEWHEN condition1 THEN statement1,WHEN condition2 THEN statement2,WHEN condition THEN statementN
   ELSE result
END;
Where, condition1, condition2, etc. Are the conditional statements and statement1, statement2, etc.. are the actions to be taken when the condition is true.
Once the condition is met, the CASE statement will stop verifying further and it will return the result.
If none of the conditions are met (TRUE), then it returns the value mentioned in the ELSE clause.
It returns NULL if the ELSE part is not mentioned and none of the conditions are TRUE.
Example
Assume we have created a table named CUSTOMERS which contains the personal details of customers including their name, age, address and salary etc. using the following query −
CREATETABLE CUSTOMERS (
   ID INTNOTNULL,
   NAME VARCHAR(20)NOTNULL,
   AGE INTNOTNULL,
   ADDRESS CHAR(25),
   SALARY DECIMAL(18,2),PRIMARYKEY(ID));
Now, insert values into this table using the INSERT statement as follows −
In the following query, we are using multiple WHEN and THEN conditions to the CASE statement along with the ELSE clause.
If the AGE of the customer is greater than 30, it returns Gen X otherwise moves to the further WHEN and THEN conditions. If none of the conditions is matched with the CUSTOMERS table, CASE returns the ‘Gen Alpha’ value as mentioned in the ELSE part of the query −
SELECT NAME, AGE,CASEWHEN AGE >30THEN'Gen X'WHEN AGE >25THEN'Gen Y'WHEN AGE >22THEN'Gen Z'ELSE'Gen Alpha'ENDAS Generation
FROM CUSTOMERS;
Output
The output produced is as follows −
NAME
AGE
Generation
Ramesh
32
Gen X
Khilan
25
Gen Z
Kaushik
23
Gen Z
Chaitali
25
Gen Z
Hardik
27
Gen Y
Komal
22
Gen Alpha
Muffy
24
Gen Z
Example
Let us take a look at another query where we want to provide a 25% increment to each customer if the amount is less than 4500 from the CUSTOMERS table previously created −
SELECT*,CASEWHEN SALARY <4500THEN(SALARY + SALARY *25/100)ENDAS INCREMENT FROM CUSTOMERS;
Output
Here, the SQL command checks if the salary is less than 4500. If this condition is satisfied, a new column ‘INCREMENT’ will contain the values that is equal to salary with 25% of increment.
Since the ELSE part is not mentioned in the above query and none of the conditions are true for few CUSTOMERS, NULL is returned, which shows that they didn’t get any increment.
ID
NAME
AGE
ADDRESS
SALARY
INCREMENT
1
Ramesh
32
Ahmedabad
2000.00
2500.000000
2
Khilan
25
Delhi
1500.00
1875.000000
3
Kaushik
23
Kota
2000.00
2500.000000
4
Chaitali
25
Mumbai
6500.00
NULL
5
Hardik
27
Bhopal
8500.00
NULL
6
Komal
22
Hyderabad
4500.00
NULL
7
Muffy
24
Indore
10000.00
NULL
CASE Statement with ORDER BY Clause
We can use CASE statement with ORDER BY clause. The ORDER BY clause in SQL sorts the result in ascending (default) or descending order.
Example
In this query, the CASE statement is used to sort the results based on either the ‘NAME’ column or the ‘ADDRESS’ column, depending on the value of the ‘NAME’ column. If the ‘NAME’ column starts with ‘K’, the results are sorted by the ‘NAME’ column; otherwise, the results are sorted by the ‘ADDRESS’ column −
SELECT*FROM CUSTOMERS
ORDERBY(CASEWHEN NAME LIKE'k%'THEN NAME
ELSE ADDRESS
END);
Output
The result obtained by executing the above query is as shown below −
ID
NAME
AGE
ADDRESS
SALARY
1
Ramesh
32
Ahmedabad
2000.00
5
Hardik
27
Bhopal
8500.00
7
Muffy
24
Indore
10000.00
3
Kaushik
23
Kota
2000.00
2
Khilan
25
Delhi
1500.00
6
Komal
22
Hyderabad
4500.00
4
Chaitali
25
Mumbai
6500.00
CASE Statement with GROUP BY Clause
We can also use the CASE statement with GROUP BY clause. The GROUP BY clause in SQL groups the rows that have same values within one or more columns where an aggregate function is applied to produce summaries.
Example
In the following query we are grouping the customers based on their salaries and calculate the sum of the salary for a specified range of customer data.
If the value in SALARY is less than or equal to 4000, the data will be grouped as ‘Lowest paid’. If the value is greater than 4000 and less than or equal to 6500, it will be grouped as ‘Average paid’. All other values will be grouped as ‘Highest paid’. The SUM function is used to calculate the total of the SALARY for each group −
We can use the CASE statement with the WHERE clause as well. The WHERE clause is used to filter the rows in a table based on a specified condition.
Example
In the following query, the CASE statement is used to return the different designations of the CUSTOMERS based on their AGE. The WHERE clause is used to filter the rows based on the SALARY of the CUSTOMERS −
SELECT NAME, ADDRESS,CASEWHEN AGE <25THEN'Intern'WHEN AGE >=25and AGE <=27THEN'Associate Engineer'ELSE'Senior Developer'ENDas Designation
FROM CUSTOMERS
WHERE SALARY >=2000;
Output
Output of the above query is as follows −
NAME
ADDRESS
Designation
Ramesh
Ahmedabad
Senior Developer
Kaushik
Kota
Intern
Chaitali
Mumbai
Associate Engineer
Hardik
Bhopal
Associate Engineer
Komal
Hyderabad
Intern
Muffy
Indore
Intern
CASE Statement with UPDATE
We can use CASE statement within the UPDATE statement to perform conditional updates on data in a table.
Example
In the following query we are updating the salary of all the customers based on their age.
If the age of the customer is equal to ’25’, their salary will be updated to ‘17000’. If the age is equal to ’32’, it will be updated to ‘25000’. For the customers with other ages, salaries will be updated to ‘12000’ −
UPDATE CUSTOMERS
SET SALARY=CASE AGE
WHEN25THEN17000WHEN32THEN25000ELSE12000END;
Output
We get the following result. We can observe that the changes have been done in 7 rows −
We can rectify the changes done in the CUSTOMERS table using the below query −
SELECT*FROM CUSTOMERS;
The table is displayed as follows −
ID
NAME
AGE
ADDRESS
SALARY
1
Ramesh
32
Ahmedabad
25000.00
2
Khilan
25
Delhi
17000.00
3
Kaushik
23
Kota
12000.00
4
Chaitali
25
Mumbai
17000.00
5
Hardik
27
Bhopal
12000.00
6
Komal
22
Hyderabad
12000.00
7
Muffy
24
Indore
12000.00
As we can see in the above table, the SALARY of all the customers has been updated corresponding to their age.
CASE Statement with INSERT
We can also insert the data into MySQL tables with the help of the CASE statement. We need to provide the INSERT INTO statement with column names and VALUES for data insertion.
Example
Here, if the age of the customer is greater than or equal to 25, then the salary will be 23000; otherwise the salary will be 14000 −
INSERTINTO CUSTOMERS (ID, NAME, AGE, ADDRESS, SALARY)VALUES(10,'Viren',28,'Varanasi',CASEWHEN AGE >=25THEN23000ELSE14000END);
Output
We get the following result. We can observe that the change has been done in 1 row −
Query OK, 1 row affected (0.01 sec)
Verification
We can rectify the changes done in the CUSTOMERS table using the below query −
The SQL EXISTS operator is used to verify whether a particular record exists in a MySQL table. While using this operator we need to specify the record (for which you have to check the existence) using a subquery.
The EXISTS operator is used in the WHERE clause of a SELECT statement to filter records based on the existence of related records in another table.
It is a logical operator.
It returns a Boolean value TRUE or FALSE.
It returns TRUE if the subquery returns at least one record.
If the EXISTS operator returns TRUE, the outer query will get executed; otherwise not.
It can be used in SELECT, UPDATE, DELETE or INSERT statements.
The EXISTS operator is more efficient than other operators, such as IN, because it only needs to determine whether any rows are returned by the subquery, rather than actually returning the data.
The use of the EXISTS operator is an efficient way to filter data in many real-life scenarios, including filtering records based on the existence of related data, aggregating data based on the existence of related records, and optimizing queries.
Syntax
The basic syntax of the SQL EXISTS operator is as follows −
WHEREEXISTS(subquery);
Where, the subquery used is the SELECT statement. The EXISTS operator will evaluate to TRUE if the subquery returns at least one record in its result set; otherwise FALSE.
EXISTS Operator with SELECT Statement
The SELECT statement in SQL is used to retrieve data from one or more tables in a database. We can use the EXISTS operator with a SELECT statement to check for the existence of rows that meet a certain condition.
Example
To understand it better let us consider the CUSTOMERS table which contains the personal details of customers including their name, age, address and salary etc. as shown below −
CREATETABLE CUSTOMERS (
   ID INTNOTNULL,
   NAME VARCHAR(20)NOTNULL,
   AGE INTNOTNULL,
   ADDRESS CHAR(25),
   SALARY DECIMAL(18,2),PRIMARYKEY(ID));
Now, insert values into this table using the INSERT statement as follows −
Now, we are retrieving the lists of the customers with the price of the car greater than 2,000,000 −
SELECT*FROM CUSTOMERS WHEREEXISTS(SELECT PRICE FROM CARS
   WHERE CARS.ID = CUSTOMERS.ID AND PRICE >2000000);
Output
The result produced is as follows −
ID
NAME
AGE
ADDRESS
SALARY
4
Chaitali
25
Mumbai
6500.00
7
Muffy
24
Indore
10000.00
EXISTS Operator with UPDATE Statement
We can also use the SQL EXISTS operator with an UPDATE statement. It helps us to update rows in a table based on the existence of matching rows in another table.
Example
Suppose if we want to change the name of certain customers from the CUSTOMERS and CARS tables previously created, then this can be done using UPDATE statement. Here, we are modifying the name ‘Kushal’ of all the customers whose id is equal to the id of the CARS table, using the EXISTS operator, as follows −
UPDATE CUSTOMERS SET NAME ='Kushal'WHEREEXISTS(SELECT NAME FROM CARS WHERE CUSTOMERS.ID = CARS.ID
);
Output
We get the following result. We can observe that 3 rows have been modified −
We can verify whether the changes are reflected in a table by retrieving its contents using the SELECT statement. Following is the query to display the records in the CUSTOMERS table −
SELECT*FROM CUSTOMERS;
The table is displayed as follows −
ID
NAME
AGE
ADDRESS
SALARY
1
Ramesh
32
Ahmedabad
2000.00
2
Kushal
25
Delhi
1500.00
3
Kaushik
23
Kota
2000.00
4
Kushal
25
Mumbai
6500.00
5
Hardik
27
Bhopal
8500.00
6
Komal
22
Hyderabad
4500.00
7
Kushal
24
Indore
10000.00
As we can see in the above table, the NAME of ‘Khilan’, ‘Chaitali’ and ‘Muffy’ has been updated to ‘Kushal’.
EXISTS Operator with DELETE Statement
The EXISTS operator can also be used with a DELETE statement to delete rows based on the existence of rows returned by a subquery.
Example
In here, we are deleting the row in the CUSTOMERS table whose id is equal to the id of the CARS table having price equal to ‘2250000’ −
DELETEFROM CUSTOMERS WHEREEXISTS(SELECT*FROM CARS
   WHERE CARS.ID = CUSTOMERS.ID AND CARS.PRICE =2250000);
Output
We get the following result. We can observe that 1 row has been deleted −
Query OK, 1 row affected (0.01 sec)
Verification
We can rectify the changes done in the CUSTOMERS table using the following query −
SELECT*FROM CUSTOMERS;
The table is displayed as follows −
ID
NAME
AGE
ADDRESS
SALARY
1
Ramesh
32
Ahmedabad
2000.00
2
Khilan
25
Delhi
1500.00
3
Kaushik
23
Kota
2000.00
5
Hardik
27
Bhopal
8500.00
6
Komal
22
Hyderabad
4500.00
7
Muffy
24
Indore
10000.00
As we can see in the above table, the row with the NAME ‘Chaitali’ has been deleted since the id of Chaitali in CUSTOMERS table was ‘4’, which is equal to the id of the CARS table having price equal to ‘2250000’.
NOT Operator with EXISTS Operator
In SQL, the NOT EXISTS operator is used to select records from one table that do not exist in another table.
Syntax
Following is the basic syntax of NOT EXISTS operator in SQL −
WHERENOTEXISTS(subquery);
Where, the subquery used is the SELECT statement.
Example
The below query gives the names of the customers who have not bought any car −
SELECT*FROM CUSTOMERS WHERENOTEXISTS(SELECT*FROM CARS WHERE CUSTOMERS.ID = CARS.ID
);
Output
Following output is obtained by executing the above query −
ID
NAME
AGE
ADDRESS
SALARY
1
Ramesh
32
Ahmedabad
2000.00
3
Kaushik
23
Kota
2000.00
5
Hardik
27
Bhopal
8500.00
6
Komal
22
Hyderabad
4500.00
Usage of SQL EXISTS Operator
The EXISTS operator in SQL is widely used in real-life scenarios to filter records based on the existence of related data in another table. Some common use cases include −
Checking for the existence of records in a many-to-many relationship − The EXISTS operator can be used to check whether a record exists in a join table for a many-to-many relationship, for example, finding all customers who have purchased a particular product.
Filtering records based on the existence of related records − The EXISTS operator can be used to filter records based on the existence of related records in another table. For example, finding all orders that have associated order details.
Aggregating data based on the existence of related records − The EXISTS operator can be used to aggregate data based on the existence of related records. For example, finding the number of customers who have placed an order.
Optimizing queries − The EXISTS operator can be used to optimize queries by only returning the necessary data. For example, finding the first order for each customer without using a self-join.
These are just a few examples of how the EXISTS operator can be used in real-life scenarios. The specific use case will depend on the data and the requirements of the query.