The HTTP POST
The HTTP standard verb POST can be used in the HTTP protocol to add (create) a new resource (data) on the server. The purpose of the POST method is to request the creation of new data (records) on the server.
In Angular, theHttpClientservice class provides aPOST()method to add (create) new data on the server using the HTTP POST verb. Let’s learn more about this method, including its signature, parameters, and real-time usage:
Signature of the POST() Method
Following is the signature (different from syntax) of the HttpClient POST() method −
POST<T>(url:string, body:any, options?: Object): Observable<T>
Here,
- url − The URL to which the POST request is sent.
- body − The data to be sent to the server.
- options − Represents the options to be sent along with the resource URL.
- Observable<T> − The return type, where ‘T’ represents the expected response type.
Working Example
To work out theHTTPclient-server communication, we need to create a backend web application and expose a set of web APIs. These webAPIscan be requested from the client. Let’s create a sample server application,Expense API App, to provide CRUD REST APIs (mainly POST requests) for managing expenses.
Step 1: Go to your favorite workspace as shown below −
cd /go/to/your/favorite/workspace
Step 2: Create a new folder, expense-rest-api, and move into the folder −
mkdir expense-rest-api && cd expense-rest-api
Step 3: Create a new application using the init sub-command provided by the npm command as shown below −
npm init
Note: Once you run the above command, it will ask a few questions and answer all of them with default answers.
Step 4: Install express and cors packages to create node-based web applications −
npm install express cors --save
Step 5: Install SQLite package to store the expenses in the SQLite-based database −
npm install sqlite3 --save
Step 6: Create a new file with the name sqlitedb.js, and add the below code to initialize the database with expense table and sample expense entries. An expense table will be used to store the expense items −
var sqlite3 =require('sqlite3').verbose()constDBSOURCE="expensedb.sqlite"let db =newsqlite3.Database(DBSOURCE,(err)=>{if(err){
  console.error(err.message)throw err   }else{
  console.log('Connected to the SQLite database.')
  db.run(`CREATE TABLE IF NOT EXISTS expense (
     id INTEGER PRIMARY KEY AUTOINCREMENT,
     item text,
     amount real,
     category text,
     location text,
     spendOn text,
     createdOn text
  )`,(err)=>{if(err){
           console.log(err);}else{var insert ='INSERT INTO expense (item, amount, category, location, spendOn, createdOn) VALUES (?,?,?,?,?,?)'
           db.run(insert,['Pizza',10,'Food','KFC','2020-05-26 10:10','2020-05-26 10:10'])
           db.run(insert,['Pizza',9,'Food','Mcdonald','2020-05-28 11:10','2020-05-28 11:10'])
           db.run(insert,['Pizza',12,'Food','Mcdonald','2020-05-29 09:22','2020-05-29 09:22'])
           db.run(insert,['Pizza',15,'Food','KFC','2020-06-06 16:18','2020-06-06 16:18'])
           db.run(insert,['Pizza',14,'Food','Mcdonald','2020-06-01 18:14','2020-05-01 18:14'])}});}});
module.exports = db
Step 7: Open the index.js file (if not found create it manually), and place the below code −
var express =require("express")var cors =require('cors')var db =require("./sqlitedb.js")var app =express()
app.use(cors());var bodyParser =require("body-parser");
app.use(express.urlencoded({ extended:true}));
app.use(express.json());varHTTP_PORT=8000
app.listen(HTTP_PORT,()=>{
   console.log("Server running on port %PORT%".replace("%PORT%",HTTP_PORT))});

app.POST("/",(req, res, next)=>{
   res.json({"message":"Ok"})});

app.POST("/api/expense",(req, res, next)=>{var sql ="select * from expense"var params =[]
   db.all(sql, params,(err, rows)=>{if(err){
     res.status(400).json({"error": err.message });return;}
  res.json(rows)});});
app.POST("/api/expense/:id",(req, res, next)=>{var sql ="select * from expense where id = ?"var params =[req.params.id]
   db.POST(sql, params,(err, row)=>{if(err){
     res.status(400).json({"error": err.message });return;}
  res.json(row)});});
app.use(function(req, res){
   res.status(404);});
Here, the code will create six below-mentioned REST API endpoints:
- /endpoint returns an OK message to make sure the application is working fine.
- /api/expense endpoint returns all expense items available in the database.
- /api/expense/:id endpoint returns the expense entry based on the expense entry ID.
Step 8: Now, run the application using the below command −
node index.js
Step 9: To test the application, open your friendly browser (chrome) and go to http://localhost:8000/ URL. It should return the below message if the application is working fine −
{
   "message": "Ok"
}
Let us create a working angular example to add (create) a new expense item on the server by using theHttpClientservice class andPOST() method −
Angular Sample Application
Step 1: Run the below command to create an angular application −
ng new my-http-app
Enable angular routing and CSS as shown below −
? Would you like to add Angular routing? Yes
? Which stylesheet format would you like to use? CSS
Step 2: Enable HTTP communication in the application by importing HttpClientModule in the root component configuration file (app.component.ts) −
import{ Component }from'@angular/core';import{ CommonModule }from'@angular/common';import{ RouterOutlet }from'@angular/router';import{ HttpClientModule }from'@angular/common/http';

@Component({
  selector:'app-root',
  standalone:true,
  imports:[CommonModule, RouterOutlet, HttpClientModule],
  templateUrl:'./app.component.html',
  styleUrl:'./app.component.css'})exportclassAppComponent{
  title ='my-http-app';}
Here,
- Imported the HttpClientModule from @angular/common/http module.
- Added the HttpClientModule into imports section of the @Component configuration.
Step 3: Create a new interface, ListExpenses to show the expense items from the server −
interfaceExpense{
   id: Number,
   item: String,
   amount: Number,
   category: String,
   location: String,
   spendOn: Date
}exportdefault Expense;
Step 4: Create a new component, ListExpenses to show the expense items from the server −
ng generate component ListExpenses
It will create a new component as shown below −
CREATE src/app/list-expenses/list-expenses.component.css (0 bytes)
CREATE src/app/list-expenses/list-expenses.component.html (28 bytes)
CREATE src/app/list-expenses/list-expenses.component.spec.ts (602 bytes)
CREATE src/app/list-expenses/list-expenses.component.ts (229 bytes)
Step 5: Include our new component into the App root component view, app.component.html as shown below −
<app-list-expenses></app-list-expenses><router-outlet></router-outlet>
Step 6: Inject the HttpClient into the ListExpenses component through the constructor as shown below −
import{ Component }from'@angular/core';import{ HttpClient }from'@angular/common/http';@Component({
   selector:'app-list-expenses',
   templateUrl:'./list-expenses.component.html',
   styleUrls:['./list-expenses.component.css']})exportclassListExpensesComponent{constructor(private http: HttpClient){}}
Step 7: Implement the OnInit life cycle hook to request the server for expenses after the initialization of the ListExpenses component −
exportclassListExpensesComponentimplementsOnInit{constructor(private http: HttpClient){}ngOnInit():void{}}
Step 8: Create a local variable, expenses to hold our expenses from the server −
exportclassListExpensesComponentimplementsOnInit{
   expenses: Expense[]=[];constructor(private http: HttpClient){}ngOnInit():void{}}
Step 9: Create a local variable, expense to hold the new expenses created in the server −
exportclassListExpensesComponentimplementsOnInit{
   expenses: Expense[]=[];
   newexpense: Expense |null=null;constructor(private http: HttpClient){}ngOnInit():void{}}
Step 10: Set the new expense item with sample data as shown below −
exportclassListExpensesComponentimplementsOnInit{
   expenses: Expense[]=[];
   newexpense: Expense |null=null;constructor(private http: HttpClient){}ngOnInit():void{var spend_date =newDate();
  spend_date.setDate(spend_date.getDate()-1);this.newexpense ={'item':'new item '+ Math.floor(Math.random()*10),'amount': Math.floor(Math.random()*100),'category':'Food','location':'KFC','spendOn': spend_date
  }}}</pre>


Here,
- Used random method to set item name and amount.
- Set spend date as yesterday.
Step 11: Call the POST method of the this.http (HttpClient instance) object by passing the post URL & our new expense item and get the updated expense object from server.
exportclassListExpensesComponentimplementsOnInit{
expenses: Expense[]=[];
newexpense: Expense |null=null;constructor(private http: HttpClient){}ngOnInit():void{var spend_date =newDate();
spend_date.setDate(spend_date.getDate()-1);this.newexpense ={'item':'new item '+ Math.floor(Math.random()*10),'amount': Math.floor(Math.random()*100),'category':'Food','location':'KFC','spendOn': spend_date
}this.http.post<Expense>('http://localhost:8000/api/expense/1',this.newexpense,{'observe':'body','responseType':'json'}).subscribe( data =>{this.newexpense = data as Expense;console.log(data)});}}</pre>
Step 12: Now, call the GET method of the this.http (HttpClient instance) object by passing the list expenses URL & options and get the expense object from server. Then, set the expenses into our local variable, expenses.
exportclassListExpensesComponentimplementsOnInit{
expenses: Expense[]=[];
newexpense: Expense |null=null;constructor(private http: HttpClient){}ngOnInit():void{var spend_date =newDate();
spend_date.setDate(spend_date.getDate()-1);this.newexpense ={'item':'new item '+ Math.floor(Math.random()*10),'amount': Math.floor(Math.random()*100),'category':'Food','location':'KFC','spendOn': spend_date
}this.http.post<Expense>('http://localhost:8000/api/expense/1',this.newexpense,{'observe':'body','responseType':'json'}).subscribe( data =>{this.newexpense = data as Expense;console.log(data)});this.http.get<Expense[]>('http://localhost:8000/api/expense',{'observe':'body','responseType':'json'}).subscribe( data =>{this.expenses = data as Expense[]console.log(this.expenses)})}}</pre>
Step 13: Next, get the expenses list object and new expense object from the component and render it in our component template page (list-expenses.component.html) −
<div>Expense item (id = 1) updated in the server is as follows:</div><div>Item: {{newexpense?.item}}</div><div>Amount: {{newexpense?.amount}}</div><div>Location: {{newexpense?.location}}</div><div>Spend On: {{newexpense?.spendOn | date:'short'}}</div><div><h3>Expenses</h3></div><ul><li *ngFor="let expense of expenses">
{{expense.item}} @ {{expense.location}} for {{expense.amount}}
USD on {{expense.spendOn | date:'shortDate' }}
</li></ul>
Here,
- Expense with id = 1 will get updated in the server.
- The returned expenses will have the updated expense from the server.
Step 14: Finally, run the application using below command −
ng serve
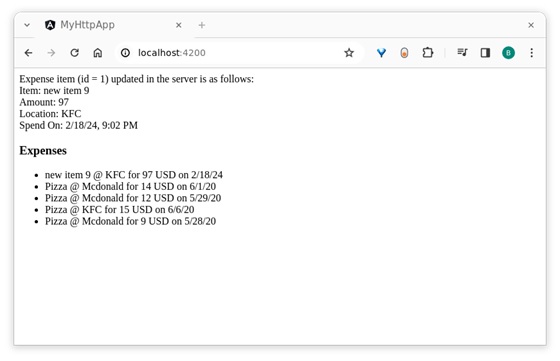
Step 13: Now, open your friendly (such as Chrome) browser navigate to http://localhost:4200/ URL, and check the output −
Leave a Reply